Understanding the Android Studio Environment
Android Studio is the official Integrated Development Environment (IDE) for Android application development, designed to provide developers with the tools needed for efficient coding and design. Understanding the Android Studio environment is essential for any developer looking to create Android applications, as it acts as the foundation for all methodology and workflow. At the heart of this IDE lies a structured project layout that organizes files and resources, making navigation and editing easier.
The primary component of the Android Studio interface is the project structure, which includes directories for source code, resources, and various configuration files. The Gradle build system is integrated into the environment, facilitating project management and dependency handling. This structure enables developers to easily locate and modify elements of their applications as needed. By familiarizing oneself with the layout and functionality of Android Studio, developers can significantly streamline their project creation process.
Another critical aspect to address is the code editor, which boasts numerous features to enhance productivity. This editor supports syntax highlighting, code completion, and debugging, ensuring that developers can write error-free code efficiently. Moreover, Android Studio provides advanced features like refactoring tools and real-time code analysis, which help in maintaining code quality throughout the development cycle.
User interface design tools are integral to Android Studio, offering a visual editor that allows developers to create engaging and user-friendly layouts. These design tools include drag-and-drop elements for UI components, preview options for various screen sizes, and constraint layouts that facilitate responsive design. Understanding how to utilize these tools effectively contributes to a well-rounded skill set in Android development.
To navigate through the various views and tool windows, one must engage with the interface actively. Being well-versed in the Android Studio environment ultimately supports confident and competent project setup, allowing developers to focus on creating their applications with greater ease and efficiency.
Creating a New Android Project

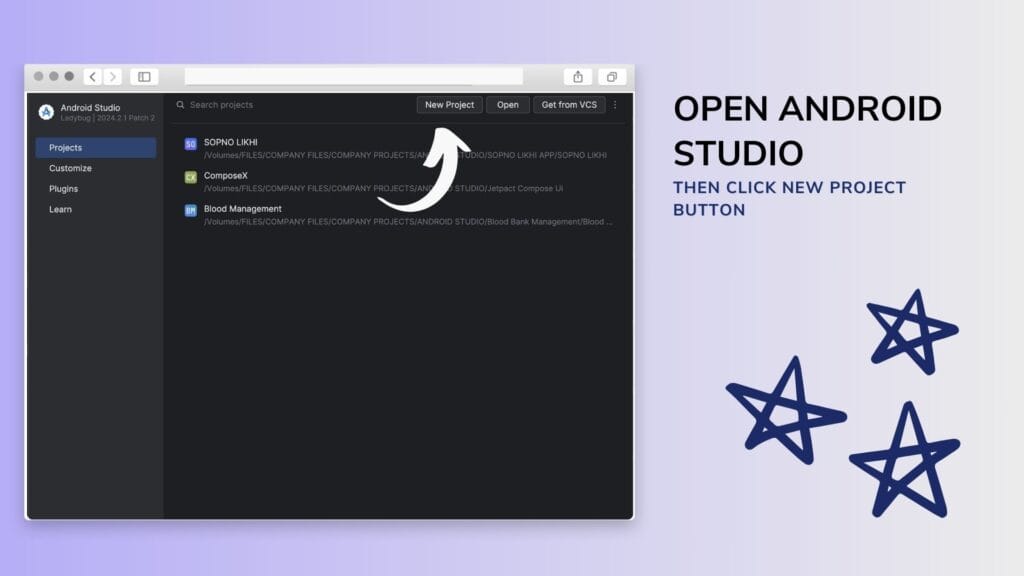
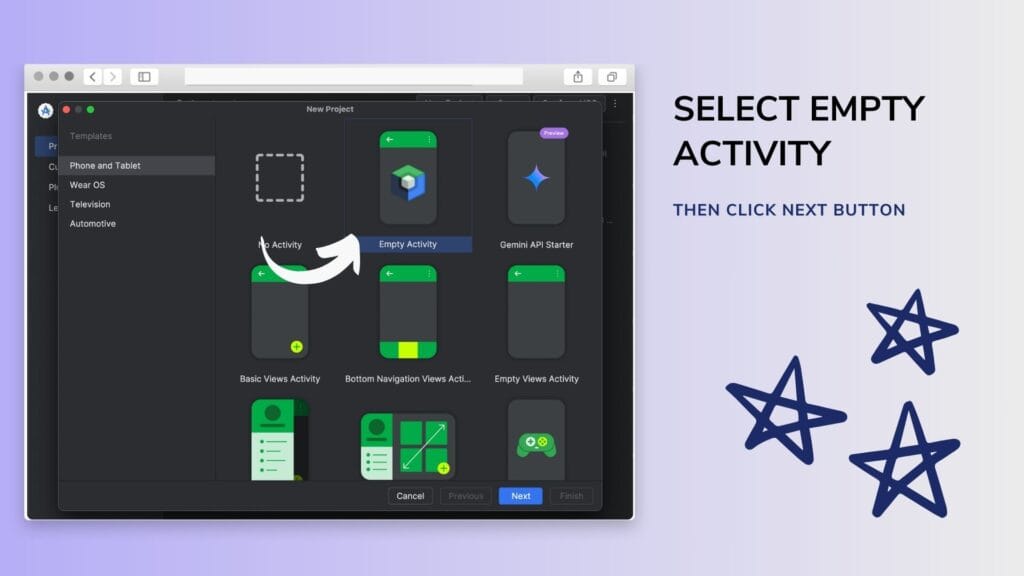
To begin setting up an Android project in Android Studio, the first step is to launch the application. Upon startup, select “New Project” from the welcome screen to start the process of creating a new Android project. You will be presented with a selection of project templates. The choice of template significantly influences the structure and features of your application, so it is advised to select one that aligns closely with your intended application type. Options include ‘Empty Activity’, ‘Basic Activity’, and ‘Fullscreen Activity’, among others.

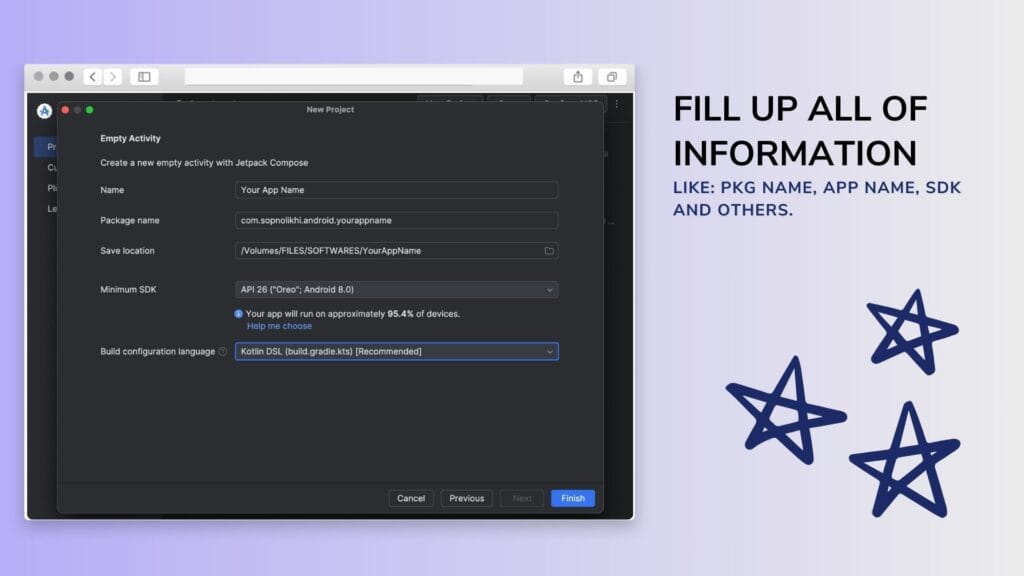
Once you have selected a template, you will need to configure essential settings for your project. Start by inputting your application name, which will be displayed on the device’s home screen. This name should be descriptive yet concise, giving users an immediate understanding of the app’s purpose. Next, define the package name, which uniquely identifies your application on the Google Play Store. It typically follows the format of the reverse domain name, such as ‘com.example.myapp’. Furthermore, you will specify the minimum SDK version, which determines the oldest version of Android that your app can run on. Choosing the proper minimum SDK version is critical for ensuring compatibility with a wide range of devices while still allowing the use of modern features.

Adopting consistent naming conventions throughout the project is vital for maintainability and collaboration. Use camelCase for class names, lower_snake_case for variable names, and keep resources organized by type. A well-structured folder organization, such as separating Java code, XML layouts, and drawable resources, fosters clarity and simplifies future development efforts. Overall, meticulous attention to naming conventions and project structure at the outset will lead to a more manageable and efficient development process.
Configuring Project Dependencies
Configuring project dependencies is a crucial step in establishing a robust and efficient Android Studio project. At the core of Android development is the Gradle build system, which simplifies the management of project dependencies with ease. Gradle allows developers to specify the libraries and frameworks required for their projects in a structured manner. When creating or modifying an Android Studio project, it is essential to understand how to leverage Gradle to ensure that all necessary dependencies are properly included.
To begin, developers can add dependencies by accessing the `build.gradle` file located in the app module. Within this file, you can specify the dependencies under the `dependencies` block. For instance, if you require a specific library such as Retrofit for networking, the line of code would typically look like this: `implementation ‘com.squareup.retrofit2:retrofit:2.9.0’`. This tells Gradle to pull the specified version of Retrofit from the repository. Pay attention to compatibility with different Android versions to avoid conflicts and ensure the app functions smoothly across devices.
Another important aspect of dependency management is handling external libraries. It is recommended to regularly update libraries to their latest stable versions to take advantage of new features and security improvements. However, this can sometimes lead to version conflicts. Using Gradle’s dependency resolution strategies can help by specifying which version takes precedence when conflicts arise. Moreover, optimizing build performance can be achieved by minimizing the number of dependencies and avoiding unnecessary library usage, which can lead to longer build times.
In summary, configuring project dependencies in Android Studio requires a thorough understanding of Gradle, careful management of external libraries, and awareness of compatibility issues. By following best practices for dependency management, developers can maintain a clean and efficient project setup that contributes to a smooth development workflow.
Setting Up Version Control and Collaboration Tools
In the modern software development environment, utilizing version control systems is essential, particularly when working on Android Studio projects. Version control systems, such as Git, facilitate the management of code changes, allowing developers to track revisions and collaborate effectively. To get started, it’s crucial to initialize a Git repository within your Android Studio project. This can be achieved by navigating to the terminal within Android Studio and executing the command git init, which sets up a new repository in your project directory.
Once the repository is established, you can begin committing changes to your code. To commit changes, use the command git add . followed by git commit -m "Your commit message". This process allows you to record the modifications made to your files, complete with descriptive messages that aid in understanding the history of your project. It is essential to commit code frequently to maintain an organized version history and prevent potential loss of work.
Collaboration is a significant aspect of software development, especially for teams working on Android applications. By utilizing platforms such as GitHub or GitLab, developers can enhance collaboration and streamline project management. These platforms allow team members to create branches for new features or bug fixes without disrupting the main codebase, making it easier to implement and test changes. Once the new code has been reviewed, it can be merged back into the main branch, ensuring that the overall project remains cohesive.
In addition to branching and merging strategies, adhering to best practices in version control will further optimize your project workflow. Regularly merging changes and resolving conflicts promptly reduces the risk of complications that may arise from concurrent development efforts. Utilizing collaboration tools effectively enhances communication among team members, enabling smoother project tracking and integration of new features.
